Setting up an smtp relay is relatively easy, since I already have a Windows Server with IIS installed. I made use of that.
So to install the smtp part of iis, the easy way is to just do it via a powershell one-liner.
Install-WindowsFeature -Name SMTP-Server -IncludeAllSubFeature -IncludeManagementTools -RestartThat will install an IIS version 6 smtp relay.
The smtp service is set to manual by default so you need to set that service to automatic to make sure it starts whenever you have rebooted the web server.
Before you start the smtp server there are a few things to take care off configuration wise. These things are easier to do in the mmc so let me go through those few steps.

Inside the IIS mmc (version 6), go to the smpt server and select properties.

On the general tab, tick the enable logging box at the bottom and select properties next to the log-file type. Select all the logs (or the ones you want) I selected all for the troubleshooting and then I checked which ones to disable later.
Click on OK.
Net go to the delivery tab on top and click on the advanced button at the bottom right.

Here you want to enter the Fully Qualified Domain Name (FQDN) of your relay server, and also verify that dns records exists.
Click ok when done
Go to the Access tab and go to relay restrictions. You do not want an open relay for a wealth of reasons. I set it to my subnet for a beginning but I will set it more granular once all is tested.
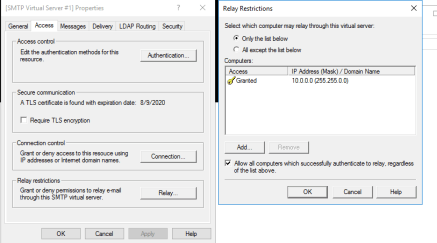
Once done, click OK twice, you should be done with initial configuration in IIS (You might want to add some certificates later, especially in a prod environment).
The next part you need to do is to test your mail server. For this reason I want to show briefly how things look:

If you do a ‘tree c:\inetpub’ it will show you the folder structure of your IIS directory. The folder of interest for us, is the “mailroot” folder. Inside this folder there is Badmail, Drop, Pickup and Queue. We will test the mail server by copying a txt file to the “Pickup” folder. The SMTP server will detect this and take action to send the file. If the mail sends successfully, you will not see the file again, because it has been sent. If mail does not send it ends up in the “queue” folder, where it stays for a while and depending on settings for the smtp server delivery will be attempted ever so often.
Anyway lets create a simple file, mail.txt, first and check if it works. It should looks something like this:

Save the file and then do a copy like below, from the folder where you saved the mail.txt file.
copy mail.txt c:\inetpub\mailroot\Pickup\
This will copy the file to the pickup folder and should send it if all is good.
If you don’t receive the email then check if you get files in the queue folder. You can open these files and check them out. Let me take a look at one error examples:
Here is a look at what the files look like in the queue folder:
![]()
You can open these files with notepad and you can then see the error messages inside. Correct the error and then retry sending a mail.

That should be it, I think you will find it is a fairly easy way to setup a mail relay, that will allow you to receive email notifications for various servers in your network. Just remember to keep the mail-relay safe.
As mentioned in one of my posts, I found one problem, I was not getting the reports I sent to myself. It turns out the problem was that IIS per default only allows 2 MB mail attachments. Once I changed that to 5 MB, I received my reports. You can change that under the properties of the smtp server in IIS6 Manager.
Edit the first box from 2048 to something more sizeable. You might want to edit the session size also.

Restart the IIS server and you should be good to go.