So now that Ansible has been installed, and the clients have been configured, it is time to start looking at the next part of the setup. By now it is possible limited how much you need to directly connect to the clients. Most things will be done from the Ansible server itself or via an editor. The first and most important thing to configure is the hosts file. You find it in “/etc/ansible/” and the file is called hosts. You can edit it from vim and it already gives you some examples of what you can configure in there.
The hosts file is a file where you enter the clients you want to manage via Ansible. More than that though, it is a file where you can also designate clients in groups. You can have clients in more than one group.
You could of course just toss your clients inside in one long list without giving any thought to how the clients are differentiated. If you do that and run a program against the hosts file every host will be adapted in the same way. With some tasks that might make sense. For example there may be a program that may be required on all clients. In most cases though it makes sense to differentiate the clients a bit and group them.
Here is a view of the default hosts file:

As you can see there are already a few examples here on how to group web and database servers and also how to include a range of hostnames.
I added a few lines under the bottom line, sorting all servers, CentOS, Debian, Web, and DB servers and assigned clients accordingly.

One nice thing is that you are not limited to ranges in numbers, although this is what I have used. You can also use it for letters in a similar fashion.
Now that this is done lets try to verify that ansible actually works as we want it to.
For example we can run ping via ansible. Run the following command:
ansible -m ping CentOS
Will take the clients in the CentOS group and run ping. (I have not installed Debian at the moment yet. For this reason I test only against the two CentOS boxes.

I get prompted for the key password (We will fix this later). The result is positive (Green colour). This program here makes use of a python call. If we had not had Python installed Ansible would have returned an error.
Another way to get the input from above would be to use for example the module raw. You will see it looks a lot more like something you type on a command line:
ansible -m raw -a 'ping -c 2 aocans01' CentOS

Something else is, what version of Python is installed. Especially now that version 2.x has been terminated, it would be good to verify that version 3 is installed on the hosts.
Shell is another module you can use. It has the benefit that you don’t have to use the absolute path to the command.
ansible -m shell -a ‘python -V’ CentOS
This should give us a negative result because I have not yet installed Python on the clients. (Actually Python 2)

So that means Python 2 is not installed but try Python3 instead and see:

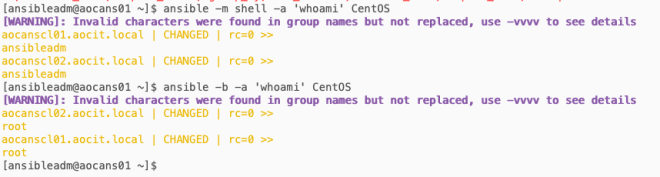
One last example is how to run commands with elevation by running the “whoami” command. The first one shows the ansible service account (or adm account). The second command is run with a -b switch, which elevates the privilege to root, and the user is in deed returned as root.
ansible -m shell -a 'whoami' CentOS
and
ansible -b -a 'whoami' CentOS
An important part to understand is that a lot of the stuff we have tried until now is really just executing files, it is limited in the way that it works. If we need to modify files individually, we will need something more. That is where playbooks and yaml starts coming into place. You can of course find much more information about these modules above and many more on the Ansible documentation page. So that’s about it for this post about the hosts file and verifying that Ansible is running as it should using various options. If those options are not enough for you, then you can find more information here.