Server Setup
So what is required to setup Ansible? Well not a lot, A linux flavour of choice. In my case CentOS, but it really doesn’t have to be. I would say the installation process is quite similar. Simply pull the files from the repo to install it, as you would with a normal package. The other thing you need is python for more advanced topics and ssh server.
In my case CentOS 8 setup, 20gb space and 2 GB RAM. I figure it is is a decent enough start. I will create a user called ansibleadm since I prefer to run everything through a user other than root.
On CentOS8 you need to enable the Epel-repository. Run the following two commands:
sudo dnf makecache

sudo dnf install epel-release
This will result in the package repo cache being updated and the second will install the epel repo.
Next run:
sudo dnf install ansible
This will install packages and dependencies. It will request that you accept the key fingerprint, as you can see around midway through below here:

That is it. Ansible is installed. You can verify it by checking the version of Ansible. Run the following command: “ansible –version“.

Clients
For the clients there is not much to setup, you simply need to have ssh server available and python. There is no agent for Ansible, which is a thing I quite like. For the lab I will setup a couple of CentOS clients and later a couple of Debian clients. For the first couple of demos post installation it will be purely CentOS platform (Ansible Server and clients). Later I will introduce the Debian clients and show where there might be some traps.
It would make sense to have the same user as you have on Ansible created. This would be a service account that has access and can perform tasks on the clients via Ansible, remember to add the user to the visudo file. An other optional part is if you like me, can’t remember IP addresses, then DNS resolution may be a good idea. You can do it via the /etc/hosts file if you don’t have a DNS server.
For Debian-based flavours of Linux, you may need to install the ssh server and ssh pass. These is included in CentOS by default.
Each of the clients will have 1 GB of RAM and 10 GB HDD. They will be minimal installations and based on CentOS 8 (aocanscl01-02) and Debian 10 (aocanscl03-04)
Since I’m ona VMware environment, it would make sense to use a template to create the hosts and add the ansibleadm account in there along with the sudo rights. This time we are doing it manually.
So after installing the clients and updating them, I ensure that I can ping everything that I need to ping (Ansible Server and Clients in between).
Post Installation tasks
You can use ssh-keygen to create a private/public key pair. This should mean you can connect to clients without having to worry about authenticating. (IF you chose to use the root account, then these steps are not necessary.
visudo
Visudo is an editor with the sole purpose of editing the sudo file, and making sure that you don’t mess up your remote access elevation in the process. In other words, visudo performs a check before it writes the file to disk. This should be done on each client you have.
Inside visudo you should add one line for your service account (Again using root, you don’t need to do this step). And give this user access and set a no password clause for when you execute sudo. You might ask yourself, why do this and not just use the root account? Well the root account is universally known as the admin account. Your Service account may not be known universally, that is already one benefit.
From the console type “sudo visudo” to edit the file or run “visudo” (as root).
Inside search for the following line: “root ALL=(ALL) ALL” (You can see the section below).
Below the lines add your service user and set the parameters as follows:
ansibleadm ALL=(ALL) NOPASSWD: ALL

This should mean you can access the sudo command without a password.
(There will be other (better?) ways to accomplish this step later, I promise).
SSH Key generation
Type ssh-keygen and a key will be created. It will prompt you for where to store the key and you have to enter a passphrase (You can skip to avoid authenticaton checks and just hit enter twice, though this of course is not recommended). You need to perform this task from the ansible server and then copy the keys to the clients.

If you run a “ls -al” you will see the folder where the key was created. Doing an ls .ssh/ will show you the two files that it contains. The .pub file is the public key. this one you need to copy to your clients. The other file is the private key. That should obviously never be copied anywhere.

You then can copy the files via ssh-copy-id:
ssh-copy-id -i .ssh/id_rsa.pub ansibleadm@aocanscl01
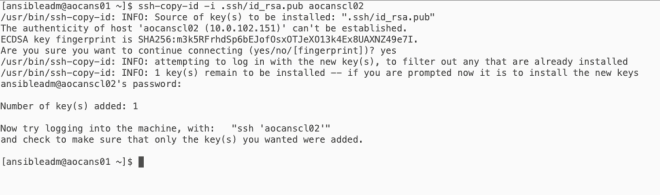
You will be prompted uf you want to accept the key and again for the password to connect the first time. You should get an information that says “Number of keys added: 1” like below:

Also you don’t need the serviceaccount@computer if you use the same name to connect to the server. You could just specify the computer name as below.
ssh-copy-id -i .ssh/id_rsa.pub aocanscl02
Such as below:
As suggested in the screenshot above, you should now be able to ssh to the clients without needing a password using the ansibleadm account (or whatever you named your ansible account).
You will be prompted for the key password when you connect. As you can also see I don’t have access to tail /var/log/messages. I would have to sudo for that. The first time I try I get Permission denied. the second time I ran sudo but I did not have to enter a password to execute the command.

Python
For Python it makes sense to install the following components also:
pip3 install requests pyVim pyVmomi --user
These are modules that helps when utilizing modules like for example for ovf deployment.
The editor of choice (and the !d-recommendation)
I use vim to edit files. I am not ashamed of it I just don’t like other editors in general. You could use something like MS VS Code and add a plugin for yaml/ansible or you can use a python editor like Pycharm. I’m sure it’s nice. It’s just not my thing. In Any case this is something you need to do on the Ansible server.
In vim you might have a small problem or two. The indents are massive and it creates problems when working with YAML files. YAML files are used to code the instructions in the playbooks of ansible. It is used a lot of other places, for example with containers. One of my colleagues really hates this language because as he says:”You have to be sober to check for indents”. For this reason it is also known as the “!d-recommendation“. It is quite simple, on the ansible server, you create a file “~/.vimrc” in your home folder and add the following lines (The ” since that is the sign for commenting in the “~/.vimrc” file, the commented line is for folder indentation which I find a bit annoying, set number enables line numbers in the vim editor. The last one is the syntax on option which colours the whole vim up like a Christmas tree.
autocmd FileType yml :setlocal sw=2 ts=2 sts=2
autocmd FileType yaml :setlocal sw=2 ts=2 sts=2
set number syntax on " If you want to set this globally you can set it as below here: " set ts=2 " set sts=2 " set sw=2
So you have options, if you use other filetypes than yml and yaml, then you can obviously add these file extensions specifically to the “~/.vimrc”. This btw is the user specific file. the global file is located in the /etc folder, in case you want to make that apply to everyone on the system
That’s it for now, in the next post about the host file and verifying things work, we will create a host file and run commands on Ansible to verify that it is working.